vCloud SAML authentication – Automation

Cant say that I did everything by my self in this post, I had a great great help from my college and friend Kasper Hansen. Also gotten a great help from the vExpert community, especially Tom Fojta.

In my last post I found out how to setup vCloud SAML against AzureAD. Now we are gonna look on how to automate each tenant to use the same AzureAD. In these days everybody have either a Microsoft og AzureAD account, so this way its easy to invite them as guest users and this way have controlled access but also ensure that vCloud users have MFA enabled.

We use VRO for the creation of vCloud tenants, in this flow we are now going to introduce a new workflow that will do following. Although the workflow is just a restcall to trigger an event in Azure Automation.

  • Create AzureAD Groups for admin and viewer
  • Post federation metadata to vCloud tenant
  • Post federation groups to vCloud tenant

Enable SAML

Fojta have some very good articles on his blog on the basic setup of SAML to different IDP systems. I also did a piece on it where Azure where the IDP provider.

Because we want to have all organisations linked to the same SAML app in Azure we need to have the same SAML certificate on all organisations. You can only do this with the API, but what the documentation did not say was that the certificate needs to be trusted by the keystore, the java keystore of the cells.

Create a self-signed certificate and make vCloud trust it

These commands will help you create a certificate and a private key in the needed pkcs8 format and certificate in the x509 format.

### Create the self-signed private key and certificate
jr@mbp:~ jr$ openssl req -x509 -nodes -days 365 -newkey rsa:4096 -keyout selfsigned.key.pem -out selfsigned-x509.crt

### Convert the private key to pkcs8 format
jr@mbp:~ jr$ openssl pkcs8 -topk8 -inform PEM -outform PEM -in 
selfsigned.key.pem -out selfsigned-pkcs8.key -nocrypt

When you have done the new self-signed certificate you need to import it to each and one of your cells. After import you will need to restart the cells. One of the errors I did here way that I tried to import a .pem where the private key and certificate where combines, that won’t work. Only import the certificate.

/opt/vmware/vcloud-director/jre/bin/keytool --import -trustcacerts -keystore /opt/vmware/vcloud-director/jre/lib/security/cacerts -alias saml -file selfsigned-x508.crt

Publish federation settings to API

We where having a lot of trial and error in this step, because that vCloud did not trust the certificate. Each time a put where done to the API the log complained. /opt/vmware/vcloud-director/logs/vcloud-container-debug.log it showed “Failed to generate keystore | requestId=<id>,request=PUT.”

Following is a example done in PowerShell, insert your self-signed certificate where it says —–END/BEGIN CERTIFICATE—–

### XML with federation metadata for AzureAD saml app
$xmlBody = 
@'
<?xml version="1.0" encoding="UTF-8" standalone="yes"?>
<OrgFederationSettings xmlns="http://www.vmware.com/vcloud/v1.5" xmlns:rasd="http://schemas.dmtf.org/wbem/wscim/1/cim-schema/2/CIM_ResourceAllocationSettingData" xmlns:ovf="http://schemas.dmtf.org/ovf/envelope/1" xmlns:vssd="http://schemas.dmtf.org/wbem/wscim/1/cim-schema/2/CIM_VirtualSystemSettingData" xmlns:common="http://schemas.dmtf.org/wbem/wscim/1/common" xmlns:vmw="http://www.vmware.com/schema/ovf" xmlns:ovfenv="http://schemas.dmtf.org/ovf/environment/1" xmlns:vmext="http://www.vmware.com/vcloud/extension/v1.5" xmlns:ns9="http://www.vmware.com/vcloud/versions" href="https://<VCD_URI>/api/admin/org/7688ff82-77e8-4f70-a4b6-b1767ab110d1/settings/federation" type="application/vnd.vmware.admin.organizationFederationSettings+xml">
<SAMLMetadata>
    ...
</SAMLMetadata>
    <Enabled>true</Enabled>
    <SamlSPEntityId>test</SamlSPEntityId>
    <SamlAttributeMapping>
    	<EmailAttributeName>EmailAddress</EmailAttributeName>
    	<UserNameAttributeName>UserName</UserNameAttributeName>
    	<FirstNameAttributeName>http://schemas.xmlsoap.org/ws/2005/05/identity/claims/givenname</FirstNameAttributeName>
    	<SurnameAttributeName>http://schemas.xmlsoap.org/ws/2005/05/identity/claims/surname</SurnameAttributeName>
    	<FullNameAttributeName>FullName</FullNameAttributeName>
    	<GroupAttributeName>Groups</GroupAttributeName>
    	<RoleAttributeName>Role</RoleAttributeName>
    </SamlAttributeMapping>
    <SamlSPKeyAndCertificateChain>
         <Key>-----BEGIN PRIVATE KEY-----
...
-----END PRIVATE KEY-----</Key>
        <CertificateChain>
-----BEGIN CERTIFICATE-----
...
-----END CERTIFICATE-----
-----BEGIN CERTIFICATE-----
...
-----END CERTIFICATE-----</CertificateChain>
     </SamlSPKeyAndCertificateChain>
</OrgFederationSettings>
'@

Invoke-RestMethod -Uri "https://<VCD_URI>/api/admin/org/$orgId/settings/federation" -Method Put  -Headers @{'x-vcloud-authorization'= $vCDAuthorizationToken ; Accept = 'application/*+xml;version=31.0'; "Content-type"  =  "application/*+xml;version=31.0"} -Body ([System.Text.Encoding]::UTF8.GetBytes(($xmlBody)))

Publish SAML groups to API

Now that the SAML metadata/certificate is uploaded and in place we need to add groups to tenant. You can read more about what groups/users should be imported in my other SAML blog post.

Each tenant have its own role ids, so when doing automation with group import we need to query the vCloud API and get the role ids. There is a specific query API to get data. When using a system account we need to specify a “VCLOUD-TENANT-CONTEXT” in the header of the request. This we we can query a tenant context from a system account.

 ### Retrieve roles from tenant
[xml]$xml = Invoke-RestMethod  -UseBasicParsing -Uri 'https://<VCD_URI>/api/query?type=role&page=1&pageSize=20&links=true'  -Method get  -Headers @{'x-vcloud-authorization'= $vCDAuthorizationToken ; Accept = 'application/*+xml;version=31.0'; "Content-type"  =  "application/*+xml;version=31.0";  "X-VMWARE-VCLOUD-TENANT-CONTEXT" = "$orgId"}'

### Find the real is for x
$RoleHref = ($xml.QueryResultRecords.RoleRecord | where {$_.Name -eq "$role"}).href

After we got the role id we can now send up the group together with the role id and this was be able to authenticate based on a SAML group from AzureAD.

### Define XML with role and groupid
$xmlBody =
@'
<Group xmlns="http://www.vmware.com/vcloud/v1.5"
    xmlns:ns9="http://www.vmware.com/vcloud/versions" name="{1}"
    type="application/vnd.vmware.admin.group+xml">
    <ProviderType>SAML</ProviderType>
    <Role href="{0}" type="application/vnd.vmware.admin.role+xml"/>
</Group>
'@ -f $RoleHref , $GroupId
 
### Post xml to vcd 
Invoke-RestMethod -UseBasicParsing -Uri "https://<VCD_URI>/api/admin/org/$orgId/groups"  -Method Post  -Headers @{'x-vcloud-authorization'= $vCDAuthorizationToken ; Accept = 'application/*+xml;version=31.0'; "Content-type"  =  "application/*+xml;version=31.0"} -Body ([System.Text.Encoding]::UTF8.GetBytes(($xmlBody)))

Conclusion

Now we have all the pieces for making automation where we can enable a tenant for SAML authentication and afterwards import f.eks. a viewer and admin group. External users will then be invited to the AzureAD, imported into the right group and now they have access to the their tenant. We can help the organisation secure the access to their virtual datacenter with MFA and they will have single sign-on with there own user that originates from their own AzureAD or Microsoft account.

A service library will be made where users can be invited to the tenant organisation. So that when one user have been invited that user will be able to invite its colleagues.

Homelab – v1

This will be a short blog series of the new setup and how you can start to do your own homelab.

The basic idea of a homelab

I have always had a homelab, small, but enough to learn and the more you learn the bigger your need is. The first homelab consisted of 2* Apple Mac mini. The Apple Mac mini is very power efficient and very quiet. Not the beefiest hardware, but just enough to be able to run a vCenter and have vSAN running.

  • Apple Mac Mini v5.1 mid-2011 A1347
  • 2.3 GHz Core i5 (I5-2415M)
  • 16GB DDR3 memory
  • Dual Drive kit
  • 256GB Cache disk
  • 600GB capacity disk

They were mounted in a Sonnet MacRack mini 1U enclosure. Which have been perfect for many years. In my small setup I have been running my pFsense firewall and all sorts of small VMs, due to the small memory amount I was primary FreeBSD VMs with services as Zabbix, Weewx, OpenHAB, Unify controller, TOR and things like that. All stuff to play around with besides VMware of cause.

“Homelabbing” is where is see people learn and are having fun, without breaking too much.

The idea of new homelab

I have always had a way higher power bill than other “normal” people”. Servers, NAS and home automation gear standing around are not good for you power bill. And that’s also why my first homelab was made of Mac mini.

So instead of having huge servers in the garage or basement, I have always tried to keep the footprint down. The WOF(WifeAprovalFactor) also makes a hit here 🙂

I have a wall-mounted 19″ rack with 12U and 600mm depth. Placed in the garage where noise is not a problem anymore.

I want to run an all-flash VMware vSAN cluster with three nodes. I don’t want only two hosts and a witness appliance, even if it works and it is a fully supported concept for small- or branch offices. I want a real scale. Each server should have one cache device and at least one SSD for the capacity tier. I went all-in and decided to go with two SSDs for capacity. All servers have to be connected with 10Gbit SFP+ for vSAN and vMotion.

Conclusion of upcoming homelab

  • Small footprint, both power, and space.
  • 3 node all-flash vSAN cluster
  • 10Gbit SFP+ networking
  • Formfactor must be rack

The new hardware

Decided to go with Supermicro hardware. They have IPMI and actually some of the E300 series is now on the VMware compatibility list.

Supermicro kits such as the E300 are a very popular choices amongst the VMware community. It got a powerful Xeon-based CPUs and support for up to 128GB of memory, it is perfect for running a killer vSphere/vSAN setup and still keeping cost, noise and power bill down.

BOM

Here is a list of what the hardware consists of. This gives a hell of horsepower for a homelab and plenty of memory and CPU for doing nested environment so test our NSX-V to NSX-T migrations etc.

NumberItem
3Supermicro E300-8D 4core Intel D-1518 2Ghz
3Intel 790p 128GB disk for cache tier
3Supermicro Riser card
3Supermicro SATA-DOM 32GB
12Samsung 32GB DDR4 memory modules
3Intel 600GB SSD for capacity tier
3Supermicro Rackmounts

Now the hardware is documented. Next will be rack and stack and how the environment will be designed 🙂

vCloud SAML authentication

vCloud have LDAP, SAML and local users as an option for tenant authentication. In this post, we are looking into SAML integration. With AzureAD.

The cool thing about AzureAD is that you will gain the MFA option out of the box, and when tenants want access we can also invite them from their own AzureAD tenant into the resource AzureAD tenant. This gives flexibility and overview of who has access.

ADFS is also an option, but there you need to keep your own infrastructure with a resource AD/ADFS and furthermore need a 3. party MFA solution.

Process:

  • Setup Enterprise app in desired resource AzureAD
  • Setup claims
  • Set federation entity id for tenant
  • Import vCloud federation metadata to AzureAD
  • Import AzureAD enterprise app federation metadata to vCloud
  • Setup allowed users/groups in vCloud

AzureAD

Let’s get started with Azure AD configuration. Login to your AzureAD portal https://portal.azure.com. Navigate to “Azure Active Directory” > “Enterprise App” and press “New Application”. Choose “Non-gallery application”. Give it the name “vCloud SAML test” and press “Add”. This will take a couple of minutes.

Navigate back to “Enterprise Apps” > “All applications” and choose your newly created App.

For test purpose, add/assign a test user to the app. This is under “Users and groups”. This user will be able to login to the enterprise app with AzureAD.

Now go to “Single Sign-on”. This will now ask for the sign-on method, and here we will choose “SAML”. This will then take us to the SAML setup. The first thing to do is importing the metadata from the cloud.

You will find the metadata by logging in to vCloud, go to the tenant, under “administration” > “federation” tab. Enter the URL for the tenant as a entity id, apply and afterwards download the metadata from the link.

You will find the metadata by logging in to vCloud, go to the tenant, under administration choose the federation tab. Enter the URL for the tenant as a entity id, apply and afterwards download the metadata from the link.

In azureAD “Upload Metadata” and chose the downloaded file from vCloud. This will give AzureAD the knowledge of where to redirect and accept request from.

vCloud can validate a couple of user/group parameters. Vmware documentation. So we will add some claims to Azure AD.

Now we will need to download the AzureAD metadata and import into vCloud. Fetch the data by pressing “Download” to the “Federation Metadata XML”.

Head over to vCloud tenant federation page again. Paste the content from the download metadata file. check the “Use SAML identity” and apply. Now we are almost ready to try it out. But first, head over to “Users” tab in vCloud. We need to add the user/role to whom are allowed to gain vCloud Access.

Here we put in the mail address and role of the user from Azure AD. When the SAML response then returns to vCloud then vCloud can see it been authenticated in Azure AD and that the user is an Org admin.

Next step would be to use groups and roles so that we can put users into groups in Azure AD and that way manage access for the tenant. But after this, we can now head to the tenant URL. We will then be redirected to the Azure AD login page, login and accept to MFA so that we can be redirected to our vCloud tenant.

And voila, we have logged into our vCloud tenant with Azure AD.

Troubleshooting:

When I first started this project I was using a GUID as a vCloud entity id. That meant that I could get it to work with ADFS but not AzureAD. I went full mole on the troubleshooting.

In the end, I intercepted the SAML responses. These are encoded in base64, easy task to decode. And afterwards, I got the XML that either ADFS or AzureAD is sending back. I could then compare them, and I saw som <ds> tags to the cert that wasn’t on in the response from AzureAD. Unfortunately, that was a duck and meant nothing.

By tailing the log from vCloud, tail -f /opt/vmware/vcloud-director/logs/vcloud-container-debug.log, I could get some hints when the SAML auth failed.

org.opensaml.common.SAMLException: Local entity is not the intended audience of the assertion in at least one AudienceRestriction

doing a bit more googling and found out that I should be looking at the <audience> tag from the two SAML responses. And yes, that made some sense.

Azure AD sets the value of this element to the value of Issuer element of the AuthnRequest that initiated the sign-on. To evaluate the Audience value, use the value of the App ID URI that was specified during application registration.
Like the Issuer value, the Audience value must exactly match one of the service principal names that represents the cloud service in Azure AD. However, if the value of the Issuer element is not a URI value, the Audience value in the response is the Issuer value prefixed with spn:.

https://stackoverflow.com/questions/38978298/azuread-jwt-token-audience-claim-prefix-makes-jwt-token-invalid

And that was the problem, spn: prefix when not using a URL as entity id. Changing it to the URL made it work.

Maybe this is obvious to the world, but I didn’t know it, but glad my troubleshooting skills where sufficient 🙂

APC 7920 PDU Console

Short post – needed to reset password on a APC PDU. Only way to do this was getting a console cable, of cause this cable is a proprietary cable of APC and not within my reach when you need it.

So found the pinout and did a little DIY. Pinout is as in the table

APC RJ12 PinDB9 Pin
1 Not used1
2(GND) Yellow5 (GND)
3 Green2 (RX)
4 Red3 (TX)
5 (GND) White5 (GND)
6 Not used1

RJ12 pluged into PDU and connected to jump wires. White and yellow is GND. Green
DB9 male console cable. White is GND pin5. Gray is TX pin3. Black is RX pin2.

Press and hold the reset button of the APC PDU. Wait for Orange LED to blink and press reset again. Check console for login each sec. When it respons you have 30 sec to login with apc/apc and reset the password.

Install and use MegaCLI on VMware host

Over the last decade, I had the fun of how having to manage an LSI based RAID controller. Never on Windows machines, where the GUI-based Storage Manager tools are simple to work with.

Even though I usually find the vib and get it installed I always struggle to remember how it’s installed and what the commands are. This time I will write it down for the future me, or you?

Procedure

  • Find the MegaCLI vib file and download it…
  • Copy vib to ESXi host
  • Install vib
  • Use MegaCLI for whatever purpose you got

Finding the vib

This is where I struggle the most. LSI was bought by Avago and soon after Avago was bought by Broadcom. So the support links for the downloads have been 404 and using Broadcom’s support site is an education degree that I do not own. This time the link was this, giving you a zip file containing the MegaCLI package for all platforms.

If the link does not work for next time, or maybe a newer version is out. I also managed to find it on https://www.broadcom.com/support/download-search. Make a keyword search for MegaCLI, expand the “management software and tools” from the results and choose the newest “MegaCLI x.x Px” For now it’s MegaCLI 5.5 P1 version 8.07.07.

Install MegaCLI

We now got the zip, extract it and under the “VmwareMN” folder there is the vib that we are gonna be needing.

### SCP it to the host
jr@mbp:~ jr$ scp /Users/jr/Download/8-07-07_MegaCLI/VmwareMN/vmware-esx-MegaCLI-8-07-07.vib root@[ESXHOST]:/tmp/

### SSH to the ESXi host and install. Reboot afterwards
[root@esxhost:~] esxcli software vib install -v /tmp/vmware-esx-MegaCLI-8-07-07.vib

If you are lucky and get a “Could not find a trusted signer” when trying to install the vib the workaround is to add “–no-sig-check” at the end of the esxcli command, after the file path. Since I downloaded it from Broadcom’s own site, I trust it.

After the host reboot(which is very annoying, but necessary). We can not find MegaCLI binary under /opt/lsi/MegaCLI/

Useful MegaCLI commands

### Enclosure information
 /opt/lsi/MegaCLI/MegaCli -EncInfo -aALL

### Virtual drive information
/opt/lsi/MegaCLI/MegaCli -LDInfo -Lall -aALL

### Physical drive information
/opt/lsi/MegaCLI/MegaCli -PDList -aALL

### Silence active alarm
/opt/lsi/MegaCLI/MegaCli -AdpSetProp AlarmSilence -aALL

### Disable alarm
/opt/lsi/MegaCLI/MegaCli -AdpSetProp AlarmDsbl -aALL

### Enable alarm
/opt/lsi/MegaCLI/MegaCli -AdpSetProp AlarmEnbl -aALL

### Prepare for removal
/opt/lsi/MegaCLI/MegaCli -PdPrpRmv -PhysDrv [E:S] -aN

### Unconfigured Bad to good
/opt/lsi/MegaCLI/MegaCli -PDMakeGood -PhysDrv[E:S] -aN

I found a guy that did a bit more advanced MegaCLI scripting, its bit old but still very useful. You can find the site here. I have done some copy-pasting from the script, but all credit goes to the guy behind the link.

### List disk status
/opt/lsi/MegaCLI/MegaCli -PDlist -aALL -NoLog | egrep 'Slot|state' | awk '/Slot/{if (x)print x;x="";}{x=(!x)?$0:x" -"$0;}END{print x;}' | sed 's/Firmware state
://g'

Conclusion

CLI is awesome, so many possibilities and so flexible. In my opinion its a bit hard to find, but after you got it installed its easy. I have tested this on ESXi6.7 and it world as it should. I hope you can use some of it.

vCloud – Changing SSL certificate

In this post, I will explain how to install a public certificate into vCloud Director cell(s). This exact environment has a public signed cert that is up for renewal. A new certificate has been bought and signed and is ready to import.

vcd cells have 2 IP addresses that allow support for 2 different SSL endpoints (http and consoleproxy). Each endpoint requires its own SSL certificate. vCloud Director uses a java keystore to read its SSL certificates from.  In a multi-cell environment, you need to create 2 certificates for each cell and import the certificates into the vcd java keystore. But since we hare here using a wildcard certificate the same certificate will be used to but endpoints.

The new certificate have been created with a CSR that was not generated from the vCloud cells, so we need to import both private and public key from an export of the certificate. In this case it’s a .PFX.

Certificate is a wildcard. If you are using a UCC SAN certificate with the exact names then be sure that the names in certificate are matching accordingly to vCloud settings.

I assume you got

  • Already working/configured vCloud environment
  • New public signed certificate exported to a .PFX format (contains both public and private key)

We will

  • Connect to cell with winscp and transfer the .PFX to /tmp/
  • Connect to cell with Putty
    • Create a new keystore with the new certificate
    • Stop vcd service
    • Swap old keystore with new
    • Start vcd service

Initialize certificate change…

winscp copy the .pfx to the cell tmp directory

The commands for creating the new keystore and importing the cert is below. Change the STOREPASS and KEYPASS to something meaningful for your environment. It is also important to notice that the alias of each certificate must be “http” and “consoleproxy”. Else vcd won’t find the certs.

A note about the alias, I have seen it generate GUID but also just numbers. So if your list command is showing “1” then you need to change alias 1 to respectively http or consoleproxy.

### Stop vCloud Director service
service vmware-vcd stop

### make passwords variable in unix
STOREPASS= <pass>
KEYPASS= <pass>

### Add the certificate to a new created certificates.ks keystore.
/opt/vmware/vcloud-director/jre/bin/keytool \
-keystore /tmp/certificates.ks \
-storepass STOREPASS \
-keypass KEYPASS \
-storetype JCEKS \
-importkeystore \
-srckeystore /tmp/wildcard2020.pfx

### List certificate alias
/opt/vmware/vcloud-director/jre/bin/keytool \
-storetype JCEKS \
-storepass STOREPASS \
-keystore /tmp/certificates.ks \
-list | grep -i alias

### Rename certificate random alias to http
/opt/vmware/vcloud-director/jre/bin/keytool \
-storetype JCEKS \
-changealias \-alias "te-d487d1c7-2c76-482a-8e61-69107ee3027f" \
-destalias http -keystore /tmp/certificates.ks

### Add the Remote Console Proxy certificate to a new created certificates.ks keystore.
/opt/vmware/vcloud-director/jre/bin/keytool \
-keystore /tmp/certificates.ks \
-storepass STOREPASS \
-keypass KEYPASS \
-storetype JCEKS \
-importkeystore \
-srckeystore /tmp/wildcard2020.pfx

### List certificate alias
/opt/vmware/vcloud-director/jre/bin/keytool \
-storetype JCEKS \
-storepass STOREPASS \
-keystore /tmp/certificates.ks -list | grep -i alias

### Rename certificate random alias to consoleproxy
/opt/vmware/vcloud-director/jre/bin/keytool \
-storetype JCEKS \
-changealias \
-alias "te-d487d1c7-2c76-482a-8e61-69107ee3027f" \
-destalias consoleproxy \
-keystore certificates.ks

### Make a backup of the existing keystore 
cp /opt/vmware/vcloud-director/certificates.ks /opt/vmware/vcloud-director/certificates.ks_old

### Copy the new keystore file to the vCloud Director environment
cp /tmp/certificates.ks /opt/vmware/vcloud-director/certificates.ks

### Set correct permissions to the keystore file
chown vcloud:vcloud /opt/vmware/vcloud-director/certificates.ks
chmod 600 /opt/vmware/vcloud-director/certificates.ks

### Make cells generate proxy console certs based on new keystore.
cd /opt/vmware/vcloud-director/bin
./cell-management-tool certificates -p -k /opt/vmware/vcloud-director/certificates.ks -w STOREPASS

### Start vCloud Director service
service vmware-vcd start

To see if the cell have booted correctly you can tail the cell log. It will give you a “startup completed in x”.

 tail -f /opt/vmware/vcloud-director/logs/cell.log

I got more than one cell…

That’s awesome – me too. You can scp the certificate from the cell with the new cert to the other cells. So let’s get that newly created keystore over the other cells.

### SSH to next cell and stop the vCloud Director service
service vmware-vcd stop

### Go to keystore path
cd /opt/vmware/vcloud-director/

### Move the existing to new filename with .old surfix.
mv certificate.ks certificate.ks.old

### Copy the new certificate into place
scp root@dc1svcdcell01:/opt/vmware/vcloud-director/certificates.ks .

### Make cells generate proxy console certs based on new keystore.
./cell-management-tool certificates -p -k /opt/vmware/vcloud-director/certificates.ks -w KEYSTORE_PASSWD

### Start vCloud Director service
service vmware-vcd start

I hope you enjoyed reading this post. Feel free to share this on social media if it is worth sharing.

Ceph MDS stuck in ‘rejoin’

CephFS filesystem suddenly dies, what do you do? Well, It’s relaying on the MDS(MetaDataService) to keep an online filesystem. When looking at the Ceph status it gives us that the MDS cache is oversized and files system is degraded. This is only health warning, but the filesystem is not available due to it, that’s good in a way because then there is nothing wrong with the Ceph cluster itself. Looking more into the problem, MDS seems to be in a recovery limbo state. hmm…

MDS services are in “rejoin” limbo state. Never coming back up.

Looking at the MDS status documentation the rejoin state indicated that it’s trying to load the old cache back in before going into “up” state. https://docs.ceph.com/docs/master/cephfs/mds-states/.

Closer looking at the logs the process is stating over and over again, but never finishes. This is due to a mechanism from the monitors kicking in and restarting the MDS service when not responding in to cluster with up in a timely fashion. So it never gets done with what’s its doing. Hmm, and CephFS is still unavailable.

Trying to set mds_beacon_grace to a wicked number did also not help, don’t know if the grace should be doing anything. But going from the default 15 to 1500 did not help. I was hoping to give the MDS time to load in the old cache.

From the logs its respawning the MDS due to lost contact to the cluster.

Going through an endless number of Ceph thread I were reading that others have encountered this exact problem. This thread gave me the info on how to remediate and get back online with the cluster. http://lists.ceph.com/pipermail/ceph-users-ceph.com/2018-August/028981.html

Setting the MDS to wipe all client session where the first one. I set this though the Ceph GUI since I find it easier to find compared to the CLI command.

Default its “false”, but setting it to global “true” no client connections are made.

The second one was to delete the MDS “mds*_openfiles.0” from the CephFS metadata pool. Looking into the pool I could the there where many objects referring to open files. But the post stated only to delete the .0 objects. Need to be done for all the MDS services that you have running. The “openfiles” objects are open file hints. It’s safe to delete them. Read more on rados commands on https://docs.ceph.com/docs/giant/man/8/rados/

### Delete for all the MDS you have running. mds1,mds2, mds3 etc.
[root@dspp-mon-a-01 cephadm]# rados -p cephfs_metadata rm mds0_openfiles.0

After deleting the open file objects I stopped all MDS services on all nodes. Some of them did not stop, so I killed the process. Probably should have stopped them first before deleting the open file objects…..

[root@dspp-osd-a-06 cephadm]# systemctl stop ceph-mds.target

After starting up the MDS services again it recovered in a couple of seconds. CephFS is available and “ceph -s” showing healthy condition. Set the wipe_sessions back to false and now CephFS could be mounted again.

What to conclude? there is a fix in 14.2.5. So when it’s ready its is time to update the Ceph cluster. The ticket for it should be this one. https://tracker.ceph.com/issues/41467. These guys also did a good help to resolve the problem https://lists.ceph.io/hyperkitty/list/ceph-users@ceph.io/thread/AOYWQSONTFROPB4DXVYADWW7V25C3G6Z/.

Disk mapping Windows/VMware

Since I’m working in a datacenter department at a service provider automation is a big thing. We have lots of different automatic workflows already. Everything from reading out power usage for co-location customers to creating a fully functional virtual datacenter with VMware vCloud Director.

The latest idea was to create an automatic disk expansion service. We monitor the customer’s environments with PRTG and call to help them with an expansion when more disk space is needed. But that’s only within business hours and of our service desk are busy we don’t always make the expansion in a timely fashion. For an exchange server, this is bad, full-disk means no mail flow.

Our backend developer(super skilled guy) extended the service agent that we run on all customer servers, with a new data collector that looks for free space and disk-identifiers. If a disk is running full he will create a RabbitMQ ticket that will trigger a vRealize Orchestrator workflow that finds the disk and expands it. Then reports back to his services so that his service can expand the disk from within Windows.

Identifying Windows disk from VMware environment

Our google foo was giving the same result over and over again, we should look at the SCSI ID. From within Windows, you can get the LUN ID and what controller its located. That position should then be the same as seen from VMware side.

While testing it on Windows 2016+ this worked ok. BUT we have customers that are still on Windows 2012, and here it didn’t work. *Sigh*. If the VM where having multiple controllers then we could not see what UnitId were to attach to the corresponding Controller Id. So back to the drawing board.

### From VMs Id and ControllerId and UnitId the disk that needs expansion is found. 
#$vmDisk = (Get-VM -Id $vmid | Get-HardDisk) | where { $_.ExtensionData.ControllerKey -eq ((Get-VM -id $vmid | Get-ScsiController ).ExtensionData | where { $_.BusNumber -eq $ControllerId }).Key } | where { $_.ExtensionData.UnitNumber -eq $SCSITargetId }

### Afterwards the disk can have the added capacity.
$vmDisk | Set-HardDisk -CapacityGB ($vmDisk.CapacityGB + $ExpandSizeGb) -Confirm:$false

We then kept looking but could not find anything in particular. Thinking about a physical disk having a serial number we began to pursue that idea, the VM should see the UUID that VMware where presenting. And yes, this sure seems to be working a Windows 2008 through Windows 2019.

VMware VM extension data – UUID

With the disk serial number approach, it was also easier to find the disk.

### UUID can be found in the VM extension data.
$vmDisk = (Get-VM -Id $vmid | Get-HardDisk) | Where-Object {$_.ExtensionData.Backing.uuid.Replace("-","") -eq $disksn } 

Conclusion:

Don’t know why other people are not suggesting the disk serial number approach instead of the SCSI ID. But my theory is that many looks at what data they can get from the vCenter GUI. And here the SCSI ID based on controller id and unit id is the only thing really available.

But there is a lot of nice data when using PowerCLI to look at the data. Especially when doing automation.

Cisco ASA cluster – upgrade

Cisco seems to have a good track record of there products, but I must say that there ASA firewalls have seen a lot of critical bugs in the last couple of years. Both in hardware and software…

The last critical bug I was not informed about, so didn’t catch it before the customer did. Always nice when a customer calls in with the problem of there primary ASA being down. It crashed in a way that meant that it did not come up again. It needed a physical reboot.

Before having the chance to have someone onsite locate the firewall and reboot it that secondary also died. And did not come up again! Customer needs to get online again, so there was no time to get a console cable and see what the heck was going on. So I told them to do a hard reboot on both firewalls. After the ASA booted they both became active again and could see each other. Great, customer online. But why and how.

Contact with Conscia Cisco support could confirm that the exact issue has been hitting multiple customers. Due to a bug, the firmware did a memory buffer overflow when being hit by a specific udp/500 attack. Great, now we know the problem and the fix is to upgrade ASA firmware.

It’s not something I do often, and I always forget to write down to procedure, so here goes.

Upgrade procedure

  1. Have a look at the cisco ASA upgrade guide, to see what version you and on and what is supported to go up to. I were on 9.8.2 and could go up to 9.13.x. So I did. https://www.cisco.com/c/en/us/td/docs/security/asa/upgrade/asa-upgrade/planning.html#ID-2152-0000000a
  2. Download and upload firmware to BOTH members of the cluster
  3. Change the boot image to the newly uploaded image
  4. Update the secondary, make a failover
  5. Update the primary and make a failover
  6. Done

Uploading the images to both nodes with TFTP.

I used the portable version of Tftpd64 by Jounin, simple and works out of the box. Copied the freshly downloaded images to both nodes.

### Primary
DS-ESB-ASA5516x# copy /noconfirm tftp://10.0.2.14/asa9-13-1-lfbff-k8.SPA disk0:/asa9-13-1-lfbff-k8.SPA
DS-ESB-ASA5516x# copy /noconfirm tftp://10.0.2.14/asdm-7131.bin disk0:/asdm-7131.bin

### Secondary
DS-ESB-ASA5516x# failover exec mate copy /noconfirm tftp://10.0.2.14/asa9-13-1$
DS-ESB-ASA5516x# failover exec mate copy /noconfirm tftp://10.0.2.14/asdm-7131$

Change config to the new image

So now we will change over the config so that it will use the new boot images that we have uploaded. First, we remove the existing boot image, and afterwards, we set the new image together with the new ASDM image.

### Show current boot image
DS-ESB-ASA5516x# show running-config boot system
boot system disk0:/gf/asa982-20-lfbff-k8.SPA

### Remove existing boot image
DS-ESB-ASA5516x(config)# no boot system disk0:/gf/asa982-20-lfbff-k8.SPA

### Add new boot image that you just uploaded
DS-ESB-ASA5516x(config)# boot system disk0:/asa9-13-1-lfbff-k8.SPA

### Reload the standby node for the new firmware to take effect
DS-ESB-ASA5516x(config)# failover reload-standby

### Look at the output from show failover, check if the standby is up and verify the firmware version.

Failover and reload the second node

So now the secondary node is booted with the new firmware, time to failover to it so we can reload and have the new firmware running on the primary node. When doing the failover you might lose the SSH connection, just connect again. This time you will be connected to the second node, that is not the active node. Reload the primary, that is now standby and wait for it up come up. It will show in the console that its sending config to mate. Just like when we did it with the first reload of the standby, secondary node.

### Controlled failover to secoundary, standby node
DS-ESB-ASA5516x# no failover active
### reload the primary, standby node for firmware to take effect.
DS-ESB-ASA5516x# failover reload-standby

You are done

Now it’s only to test, and if you want, failback to the primary. But that up to you. I did not lose one ping through the upgrade process. So that cluster is indeed working as it should. While you are at it then why not also update the AnyConnect client and remember to clean up the flash so the old versions and file won’t fill it up. Enjoy your newly updated cluster.

Prevent Drive Failure at 32,768 Hours

This is one of the nasty bugs. Some SSD models will fail after they have been powered on for more than 32768 hours. Imagine running vSAN and you bought x amount of disks that where affected. They will all fail at the same time, so you are left alone with your backup(hopefully).

I seen this one time before, where Intel disks where the problems. Unfortunately the Intel SSDs where metadata disks in a Ceph storage cluster, and since they all failed at the same time, the cluster died!

This is of cause due to that nobody where informed of the bug. When buying hardware from HPE and other enterprise hardware vendors we cat a mail letting us know of the problem before it becomes a disaster.

https://support.hpe.com/hpsc/doc/public/display?docId=emr_na-a00092491en_us

Update procedure – VMware

We had to do a firmware update of the disks, we are running VMware and vSAN. And gladly HPE have allready released the patch. Also with guidance for VMware.

https://support.hpe.com/hpsc/swd/public/detail?swItemId=MTX_6089c15599b647aca0c049ce24#tab2

  1. download the patch, copy it to /tmp of the ESXi servers.
  2. Unzip and make the .vmexe file executable chmod +x CP****.vmexe
  3. Put one of the hosts into maintenance mode.
  4. Run the CP***.vmexe – ./CP****.vmexe. It will lists the disks that it found and you tell it the disk numbers for those you want to have firmware upgraded.
  5. After upgrade I did a reboot anyway.

Remember that reboot of vSAN nodes can take a long time, 10-30 min. On the console of the server it says: “vSAN initialising SSD XXX” Give it time, it will boot.

Fetching firmware version

When you use the HPE custom VMware image then we have all the HPE tools on the server, so that we can query hardware etc.

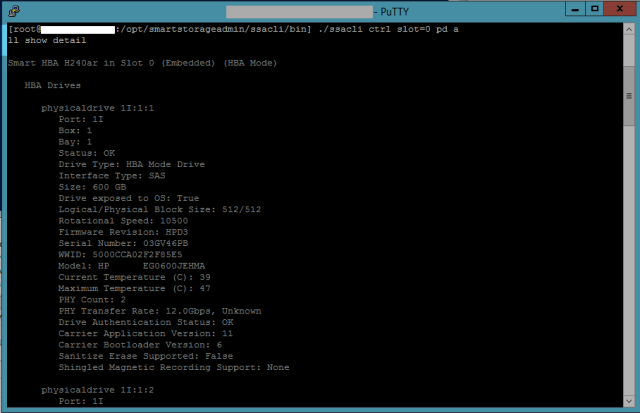
  1. cd /opt/smartstorageadmin/ssacli/bin
  2. Execute ./ssacli ctrl slot=0 pd all show detail

For more a command cheat sheet you could look at https://wiki.phoenixlzx.com/page/ssacli/ or the official documentation https://support.hpe.com/hpsc/doc/public/display?docId=c03909334

This will give you all info on the disks behind the controller. The model number is the one that you can look up on HPEs site to see if its affected.

vRO – start a workflow with AQMP message

System to system interaction can be hard. API integrations are a way of doing it, but we can also use a message bus. Actually I think that using a message bus is a very awesome way of doing it, it’s a very loose couple between systems and we can queue multiple things and have the task or messages in RabbitMQ until system is ready to consume the messages.

This is a guide of using vRO to pick up the RabbitMQ message and start a workflow with the payload of the message.

Adding RabbitMQ to vRO:

  • Open vRO legacy client, login
  • Expand Library > AMQP > Configuration
  • Start the workflow Add a broker. This will pair vRO and RabbitMQ.
  • Follow the wizard. I’m using a virtual host, but input all depends on your RabbitMQ config.
Running the workflow “Add a broker” to pair vRO and RabbitMQ.

Subscribe vRO to a RabbitMQ queue:

From the same position in vRO, now run the workflow “Subscribe to queues“. This will make vRO aware of the queue and be able to use it as a trigger.

Subscribing to a RabbitMQ queue.
Give the queue subscription a name.
Choose the broker we added in the section before.
Add the name of the queue from RabbitMQ, must be identical from what the queue name is in RabbitMQ.

Now vRO is monitoring the queue, we are ready to proceed.

Creating a policy:

Now we need to create a policy that can tie the event of a message from RabbitMQ into a starting a workflow.

Navigate to the policy fane in vRO and create a new policy.
Inside the new policy, add a new policy element.
Choose the AMQP:Subscription.
From the popup you can now filter for the queue that you earlier made a subscription on.
Right-click the queue name and chose Add trigger event
Choose onMessage
Holding focus at the “onMessage” event we can choose a workflow that the policy will start on message.
You will need to search, this time its for the workflow that you want to start when there is a message in the queue.
Now we will need to map a variable to the payload of the message that we have received. You need to have an in variable declared as a string in the workflow that you have mapped to.
The in variable from your workflow will show and by double-clicking on the name of the variable you are able to choose the “event.key.body” to it. This will make the payload of the message become a variable for your workflow.

Wrap-up:

That was a lot of screen dumps, I hope it still makes sense.

Now you should make the policy start when vRO starts and for now also start the policy so that you can see it works. The case that is shown in the screen dumps will have a JSON as the message payload, it then sends it to the messageBody variable and then inside the script it will extract the values that it needs in for the workflow to run.

Example of how to parse the JSON to a JavaScript object and afterwards parse the needed parameters over to a new variable. In this case its parameters for a PowerShell script.

Killing a virtual machine the esxcli way

Rarely I run into a ghost VM. I can’t do anything with the VM from vCenter or local UI for the ESXi host. It looks like it’s powered off but in fact, it’s still running in a sort of ghost state. You can vMotion all VMs of and reboot that hosts that the ghost VM is on. Sometimes its standalone hosts and then killing the VMs world with esxcli is easier.

  1. Connect to the ESXi host with ssh
  2. Get a list of all running VM worlds
esxcli vm process list

3. Identify the world from the output and take note of the World ID. From here we will kill the world. Start with type soft and then escalate it if it doesn’t work.

esxcli vm process kill --type=[soft/hard/force] -–world-id=ID

VM should now be killed, the VMX files are unlocked and you can manage the VM with the GUI tools again. If it didn’t work then you are left with the option to reboot the host containing the ghost VM.

Clear Windows print queue

Even as an infrastructure guy in a datacenter you now and then have to deal with printers. The small beasts with there own life and horrible drivers! I always forget the path for where the spooler puts its temp files. So now I put it here for future me to find it again next time I have to clear spooler files and restart det print services.

GUI way is slow and by having the CMD edition you can always guess what should be done in the GUI.

  1. Open an elevated command prompt.
  2. Type net stop spooler then press “Enter“.
  3. Execute del %systemroot%\System32\spool\printers* /Q
  4. Type net start spooler then press “Enter“.
  5. The print queue on your Windows should now be cleared.

ESXCLI host upgrade procedure

Most of the time you would want to use VMware Update Manager when doing upgrade. Its part of vCenter and is necessary tool when having to maintain your environment. But for smaller deployments, with standalone hosts and no vCenter the following upgrade methods are desired and can help the upgrade time. Instead of having to upgrade with IPMI and an ISO.

Online mode:

This method is for getting the update online, no need to download ISO/offline bundles, etc. This will work for most of the upgrade use cases.

1: Connect to your ESXi host via the host client and enable SSH. Afterward ssh to the ESXi host and enable ESXi firewall rule to allow the host to access the internet.

esxcli network firewall ruleset set -e true -r httpClient

2: With the beneath command you will get a list of available ESXi packaged that are on the VMware repos. Enter this command to list all available profiles. We filter only those which are relevant to our case – upgrade to ESXi 6.7

esxcli software sources profile list -d https://hostupdate.vmware.com/software/VUM/PRODUCTION/main/vmw-depot-index.xml | grep -i ESXi-6.7

3. Chose the desired profile and use the following command for choosing and upgrading the ESXi version. Before upgrade its a good idea to enter maintenance mode.

esxcli system maintenanceMode set --enable true
esxcli software profile update -p ESXi-6.7.0-20190402001-standard -d https://hostupdate.vm
ware.com/software/VUM/PRODUCTION/main/vmw-depot-index.xml

4. After it’s done, you will need to restart the host, after its rebooted you will run on the new ESXi version.

Custom, with Offline bundle:

This method is for when you desire to install a custom update, or that your hosts down have access to the internet.

1: Download the offline bundle from the VMware webpage, in this upgrade I will use an HPE custom version. But if you run a generic version, that will also work.

2: After downloading the “VMware-ESXi-6.7.0-8169922-depot.zip” file, place it (upload it) to a datastore which is visible by your ESXi host. Best would be a local datastore if this host has some. If not, it can also be a shared datastore too.

3: Find the profile name from the depot offline bundle

 esxcli software sources profile list -d /vmfs/volumes/prd.r60lun01/ISO/VMware-ESXi-6.7.0-Up
019-depot.zip

Put your host into maintenance mode, enable SSH if you haven’t done yet.

3: Execute this command to upgrade your ESXi 6.x to 6.7

esxcli software profile update -p ESXi-6.7.0-13006603-standard -d /vmfs/volumes/your_datastore/VMware-ESXi-6.7.0-13006603-depot.zip

esxcli software profile update -p HPE-ESXi-6.7.0-Update2-Gen9plus-670.U2.10.4.1.8 -d /vmfs/volumes/prd.r60lun01/ISO/VMware-ESXi-6.7.0-Update2-13006603-HPE-Gen9plus-670.U2.10.4.1.8-Apr2019-depot.zip

After checking that your upgrade was successful, reboot your host. You should see a message saying that the upgrade completed successfully.

Troubleshooting

I have tried to get an error with:

Failed updating the bootloader: Execution of command /usr/lib/vmware/bootloader-installer/install-bootloader failed: non-zero code returned…. return code: 1”

Error when upgrading, due to “insufficient space”.

This problem is due to the SWAP is but on the installation of the ESXi, not a good thing. So let’s change it.

Go to the UI of the ESXi Hosts https://IP/ui, login and proceed to the following:

Manage > System > Swap > Edit Settings

Chose the dropdown and select a datastore. Apply and the swap space is not freed from the ESXi install device so that you can try to upgrade again.

Conclusion:

After the upgrade, it’s a good idea to disable the ESXi firewall rule for “HTTP outside access”. Stop and disable SSH again, but it’s optional 🙂

esxcli network firewall ruleset set -e false -r httpClient

Now you should have an upgraded host.

NSX 6.3.6 to 6.4.5 – Controller problem encountered

NSX upgrades can be a delicate thing to upgrade, even though everything is in its finest shape.

After we successfully have upgrade the NSX managers we proceeded with upgrading of the NSX Controllers. We did pre-check and issued command “show control-cluster status” and it looked fine, upgrade to 6.4.6 went well and we could vMotion VMs around after the controller was booted. But post-checks was not ok, the “show control-cluster status” did not return as expected and we where not confident to proceed with the host upgrades.

After some trouble shooting we found that the /var/log partition on 2/3 of the controllers where full. Without any other evidence we concluded that this was the problem. After some google-fu we didn’t find any KB or blogs on how to purge logs.

But we found out that we could get into a engeering mode that would give us shell access. Long store short, we did the following:

1. https://kb.vmware.com/s/article/2149630 to gain shell access on manager
1.1 password is IAmOnThePhoneWithTechSupport
2. Extracting root passwords for controllers with /home/secureall/secureall/sem/WEB-INF/classes/GetNvpApiPassword.sh controller-nn
3. Loged into each controller, and issued : debug os-shell and thereby gain root shell access.
4. Deleted /var/log/syslog.1 on each node.
5. Rolling restart of controllers and after they booted they all joined the cluster.


After this we got the status as we wanted. In the mean while we had create a case with VMware support and the supporter was on a remote session with us. We told him what we have done, we verified that the controlleres was health and they where.

Next step, VIB upgrade on the hosts.

Good commands to know:

show process monitor
show controller list all
show control-cluster status

Edit: This article from VMware have the exact problem we encountered. We also contacted VMware Support, but before they where able to assist us we had the problem solved. 🙂
https://kb.vmware.com/s/article/59509

Process of getting the root password for controllers.

Tomcat9 and java12 on FreeBSD

Quick post, had to make Tomcat9 and Java12 work together. The procedure is as follows:

1. pkg install tomcat9 (it will also install java8)
2. pkg install openjdk12

Now and edit /etc/rc.conf with a parameter to start tomcat on boot and set the tomcat java_home.

tomcat9_enable="YES"
tomcat9_java_home="/usr/local/openjdk12"

And not to part that took me a long time to figure out. In Java12, there is no longer a feature that tomcat is using in its startup parameters. But if you remove that from the init script you are able to start it up. The line is: Djava.endorsed.dirs=’/usr/local/apache-tomcat-8.0/endorsed’ \

command="/usr/local/bin/jsvc"
command_args="-java-home '${_tomcat_java_home}' \
        -server \
        -user ${_tomcat_catalina_user} \
        -umask ${_tomcat_umask} \
        -pidfile '${pidfile}' \
        -wait ${_tomcat_wait} \
        -outfile '${_tomcat_stdout}' \
        -errfile '${_tomcat_stderr}' \
        -classpath '${_tomcat_catalina_home}/bin/bootstrap.jar:/usr/local/share/java/classes/commons-daemon.jar:$
{_tomcat_catalina_home}/bin/tomcat-juli.jar${_tomcat_classpath}' \
        -Djava.util.logging.manager=${_tomcat_logging_manager} \
        -Djava.util.logging.config.file='${_tomcat_logging_config}' \
        ${_tomcat_java_opts} \
        -Djava.endorsed.dirs='/usr/local/apache-tomcat-8.0/endorsed' \<<<<<<<<<<<< Remove this line!!!
        -Djava.endorsed.dirs='${_tomcat_catalina_home}/endorsed' \
        -Dcatalina.home='${_tomcat_catalina_home}' \
        -Dcatalina.base='${_tomcat_catalina_base}' \
        -Djava.io.tmpdir='${_tomcat_catalina_tmpdir}' \
        org.apache.catalina.startup.Bootstrap \
        ${_tomcat_pipe_cmd}"

run_rc_command "$1"

After this, you are now able to boot tomcat9 with java12 🙂

Getting all domains from Office365 tenants

Mail spoffing etc. is a big problem, there are technologies that can help, but many domain owners have not yet implemented them. To help our customers we have started to monitor and see if the SPF, DKIM and DMARC policies have been implementened, and if not we can help 🙂

Our own spamfilter solution have a button that gives you an export over all the domains, nice and easy, but Office 365 CSP portal doesnt.

So there is a quick script to help with that. Next post will hopefully contain the checkscript for if the domain have implemented SPF, DKIM or DMARC.

$tenantIds = Get-MsolPartnerContract -All | Select-Object TenantId

foreach ($tenantid in $tenantIds)
{
    $domains = Get-MsolDomain -TenantId $tenantid.TenantId
    $customer = Get-MsolCompanyInformation -TenantId $tenantId.TenantId


    foreach ($domain in $domains)
    {
        if($domain.Name -match 'microsoft')
            {
            }
             else {

                $data = @(
                    [pscustomobject]@{Domain=$domain.Name;Customer=$customer.DisplayName}
                )
                $data | Export-Csv -Path C:\temp\domainsInO365.csv -Append
             }
    }

}

NSX Edge PowerShell manipulation

This is from a VMware support experience. A customer could not change DNS server parameters of the NSX Edge IP Pool. But actually is was a problem due to a bug in VCD 9.5, where a Edge XML config was missing some tags and therefor not being able to validate the XML when VCD post the edited XML config back to NSX manager.

I have attached VMware support answer in the bottom of the post.

Script will get all edges from the NSX manager, then you find the correct one and fill into the next part of the script. Then you get the XML down to a file on your local machine, you then edit the file and put in the missing tags and lastly PUT the XML backup NSX manager. After this operation, it works from the GUI again.

# Import credential module and login information
$ReturnObj = import-credentials vmwareSSO
$nsxUsername = $ReturnObj.Username
$nsxPassword = $ReturnObj.Password

# Other variables
$tempFile = "C:\temp\edge-747_jvr.xml"

# Allow all SSL protocols
$AllProtocols = [System.Net.SecurityProtocolType]'Ssl3,Tls,Tls11,Tls12' 
[System.Net.ServicePointManager]::SecurityProtocol = $AllProtocols

Add-Type @"
    using System;
    using System.Net;
    using System.Net.Security;
    using System.Security.Cryptography.X509Certificates;
    public class ServerCertificateValidationCallback
    {
        public static void Ignore()
        {
            ServicePointManager.ServerCertificateValidationCallback += 
                delegate
                (
                    Object obj, 
                    X509Certificate certificate, 
                    X509Chain chain, 
                    SslPolicyErrors errors
                )
                {
                    return true;
                };
        }
    }
"@


[ServerCertificateValidationCallback]::Ignore();

# Getting all edges
$Type = "Accept: application/xml"
$Header = @{"Authorization" = "Basic " + [System.Convert]::ToBase64String([System.Text.Encoding]::UTF8.GetBytes($nsxUsername + ":" + $nsxPassword))}
$nsxUri = "https://10.1.10.4/api/4.0/edges"

[xml]$edges = (Invoke-WebRequest -Uri $nsxUri -Headers $Header -Method GET -ContentType $Type).Content
foreach ($edge in $edges.pagedEdgeList.edgePage.edgeSummary)
{
    $edgeInfo = "name: {0} - ID: {1}" -f $edge.name, $edge.objectId
    $edgeInfo
}

# Getting specefic edge config
$edgeId = "edge-747"
$Type = "Accept: application/xml"
$Header = @{"Authorization" = "Basic " + [System.Convert]::ToBase64String([System.Text.Encoding]::UTF8.GetBytes($nsxUsername + ":" + $nsxPassword))}
$nsxUri = "https://10.1.10.4/api/4.0/edges/$edgeId"

(Invoke-WebRequest -Uri $nsxUri -Headers $Header -Method GET -ContentType $Type).Content | out-file $tempFile

# PUT edge config after edit
$Type = 'application/xml'
$Header = @{"Authorization" = "Basic " + [System.Convert]::ToBase64String([System.Text.Encoding]::UTF8.GetBytes($nsxUsername + ":" + $nsxPassword))}
$nsxUri = "https://10.1.10.4/api/4.0/edges/$edgeId"
$edgeConfigAltered = Get-Content $tempFile

$respons = Invoke-WebRequest -Uri $nsxUri -Headers $Header -Method Put -ContentType 'application/xml' -Body $edgeConfigAltered
# Statuscode 204 is accepted
$respons.StatusCode

From Support:
– The issue you are seeing is a known issue 9.5.
– Like I mentioned in the previous email, this is due to missing elements from the xml.
– From the xml in the logs, I could see there are 52 NAT rules on that edge.Correct me if I am wrong. The following 2 rules had the elements missing

<natRule>
    <ruleId>196726</ruleId>
    <ruleType>user</ruleType>
    <action>dnat</action>
    <vnic>0</vnic>
    <originalAddress>IP</originalAddress>
    <translatedAddress>IP</translatedAddress>
    <dnatMatchSourceAddress>any</dnatMatchSourceAddress>
    <loggingEnabled>false</loggingEnabled>
    <enabled>true</enabled>
    <description>RULE</description>
    <protocol>tcp</protocol>
    <originalPort>3417</originalPort>
    <translatedPort>3478</translatedPort>
    <dnatMatchSourcePort>any</dnatMatchSourcePort>
</natRule>
<natRule>
    <ruleId>196727</ruleId>
    <ruleType>user</ruleType>
    <action>dnat</action>
    <vnic>0</vnic>
    <originalAddress>IP</originalAddress>
    <translatedAddress>IP</translatedAddress>
    <dnatMatchSourceAddress>any</dnatMatchSourceAddress>
    <loggingEnabled>false</loggingEnabled>
    <enabled>true</enabled>
    <description>RULE</description>
    <protocol>tcp</protocol>
    <originalPort>3416</originalPort>
    <translatedPort>3234</translatedPort>
    <dnatMatchSourcePort>any</dnatMatchSourcePort>
</natRule>

I have attached the file with the list of all the NAT rules seen from the logs if you need to cross-verify.

Plan:
– To fix the issue,please follow https://kb.vmware.com/s/article/67193

If you have any further questions,let me know.

Have a good evening,

Best regards,

Deepthy

Make a clone of VMs to NAS – The PowerCLI way

Quick post, had a customer that yearly wants a clone of their VMs, copied to a NAS, and then shipped to customers HQ. The owner of the company put this as a requirement. Fair enough. I have almost always done the clone of the VMs by GUI, in the start, this was easy because they only had 5 servers, but they now have more. So this time I wanted to try and script it instead. It took me some extra time, but in the end, I think it’s worth it. My PowerShell skills are not great, still learning so bear with me.

# Variables
$vcenter = "<IP or hostname>"
$cluster = "<name of cluster that contains the servers>"
$nfsIP = "1.2.3.4"
$nfsMount = "/nfs"

# Getting VMware PowerShell Modules
Get-Module -Name vmware* -ListAvailable | Import-Module

# Connect to vcenter
Connect-VIServer -Server $vcenter -User <username>

# Mount NAS 
get-cluster $cluster | get-vmhost | new-datastore -nfs -name NAS -path $nfsMount -nfshost $nfsIP

# More Variables
$ds = get-datastore NAS
$tempHost = "esx74.domain.tld"
$vms = Get-VM -Name customer*

# Copy all 
foreach ($vm in $vms)
{
    new-vm -name "$($vm.name)-clone" -VM $vm -Datastore $ds -vmhost $tempHost
    Remove-VM -VM "$($vm.name)-clone" -DeleteFromDisk:$false -Confirm:$false -RunAsync
}

# Remove datastore from hosts again
Get-Cluster $cluster | Get-VMHost | Remove-Datastore -Datastore $ds

FreeNAS installation failed – Operation not permitted

Ran into an annoying problem, have been having this problem multiple times in the past, and never remember what the fix is. So now it’s on the blog for the next time that I need it. Use the shell option in the FreeNAS installer, the disks that I wanted to install onto was ada0 and ada1.

1. sysctl kern.geom.debugflags=0x10
2. dd if=/dev/zero of=/dev/ada0 bs=512 count=1 && dd if=/dev/zero of=/dev/ada1 bs=512 count=1

This will wipe out the sectors that keep the partition schema and afterward, you can install FreeNAS without problems.