Disk mapping Windows/VMware

Since I’m working in a datacenter department at a service provider automation is a big thing. We have lots of different automatic workflows already. Everything from reading out power usage for co-location customers to creating a fully functional virtual datacenter with VMware vCloud Director.

The latest idea was to create an automatic disk expansion service. We monitor the customer’s environments with PRTG and call to help them with an expansion when more disk space is needed. But that’s only within business hours and of our service desk are busy we don’t always make the expansion in a timely fashion. For an exchange server, this is bad, full-disk means no mail flow.

Our backend developer(super skilled guy) extended the service agent that we run on all customer servers, with a new data collector that looks for free space and disk-identifiers. If a disk is running full he will create a RabbitMQ ticket that will trigger a vRealize Orchestrator workflow that finds the disk and expands it. Then reports back to his services so that his service can expand the disk from within Windows.

Identifying Windows disk from VMware environment

Our google foo was giving the same result over and over again, we should look at the SCSI ID. From within Windows, you can get the LUN ID and what controller its located. That position should then be the same as seen from VMware side.

While testing it on Windows 2016+ this worked ok. BUT we have customers that are still on Windows 2012, and here it didn’t work. *Sigh*. If the VM where having multiple controllers then we could not see what UnitId were to attach to the corresponding Controller Id. So back to the drawing board.

### From VMs Id and ControllerId and UnitId the disk that needs expansion is found. 
#$vmDisk = (Get-VM -Id $vmid | Get-HardDisk) | where { $_.ExtensionData.ControllerKey -eq ((Get-VM -id $vmid | Get-ScsiController ).ExtensionData | where { $_.BusNumber -eq $ControllerId }).Key } | where { $_.ExtensionData.UnitNumber -eq $SCSITargetId }

### Afterwards the disk can have the added capacity.
$vmDisk | Set-HardDisk -CapacityGB ($vmDisk.CapacityGB + $ExpandSizeGb) -Confirm:$false

We then kept looking but could not find anything in particular. Thinking about a physical disk having a serial number we began to pursue that idea, the VM should see the UUID that VMware where presenting. And yes, this sure seems to be working a Windows 2008 through Windows 2019.

VMware VM extension data – UUID

With the disk serial number approach, it was also easier to find the disk.

### UUID can be found in the VM extension data.
$vmDisk = (Get-VM -Id $vmid | Get-HardDisk) | Where-Object {$_.ExtensionData.Backing.uuid.Replace("-","") -eq $disksn } 

Conclusion:

Don’t know why other people are not suggesting the disk serial number approach instead of the SCSI ID. But my theory is that many looks at what data they can get from the vCenter GUI. And here the SCSI ID based on controller id and unit id is the only thing really available.

But there is a lot of nice data when using PowerCLI to look at the data. Especially when doing automation.

Cisco ASA cluster – upgrade

Cisco seems to have a good track record of there products, but I must say that there ASA firewalls have seen a lot of critical bugs in the last couple of years. Both in hardware and software…

The last critical bug I was not informed about, so didn’t catch it before the customer did. Always nice when a customer calls in with the problem of there primary ASA being down. It crashed in a way that meant that it did not come up again. It needed a physical reboot.

Before having the chance to have someone onsite locate the firewall and reboot it that secondary also died. And did not come up again! Customer needs to get online again, so there was no time to get a console cable and see what the heck was going on. So I told them to do a hard reboot on both firewalls. After the ASA booted they both became active again and could see each other. Great, customer online. But why and how.

Contact with Conscia Cisco support could confirm that the exact issue has been hitting multiple customers. Due to a bug, the firmware did a memory buffer overflow when being hit by a specific udp/500 attack. Great, now we know the problem and the fix is to upgrade ASA firmware.

It’s not something I do often, and I always forget to write down to procedure, so here goes.

Upgrade procedure

  1. Have a look at the cisco ASA upgrade guide, to see what version you and on and what is supported to go up to. I were on 9.8.2 and could go up to 9.13.x. So I did. https://www.cisco.com/c/en/us/td/docs/security/asa/upgrade/asa-upgrade/planning.html#ID-2152-0000000a
  2. Download and upload firmware to BOTH members of the cluster
  3. Change the boot image to the newly uploaded image
  4. Update the secondary, make a failover
  5. Update the primary and make a failover
  6. Done

Uploading the images to both nodes with TFTP.

I used the portable version of Tftpd64 by Jounin, simple and works out of the box. Copied the freshly downloaded images to both nodes.

### Primary
DS-ESB-ASA5516x# copy /noconfirm tftp://10.0.2.14/asa9-13-1-lfbff-k8.SPA disk0:/asa9-13-1-lfbff-k8.SPA
DS-ESB-ASA5516x# copy /noconfirm tftp://10.0.2.14/asdm-7131.bin disk0:/asdm-7131.bin

### Secondary
DS-ESB-ASA5516x# failover exec mate copy /noconfirm tftp://10.0.2.14/asa9-13-1$
DS-ESB-ASA5516x# failover exec mate copy /noconfirm tftp://10.0.2.14/asdm-7131$

Change config to the new image

So now we will change over the config so that it will use the new boot images that we have uploaded. First, we remove the existing boot image, and afterwards, we set the new image together with the new ASDM image.

### Show current boot image
DS-ESB-ASA5516x# show running-config boot system
boot system disk0:/gf/asa982-20-lfbff-k8.SPA

### Remove existing boot image
DS-ESB-ASA5516x(config)# no boot system disk0:/gf/asa982-20-lfbff-k8.SPA

### Add new boot image that you just uploaded
DS-ESB-ASA5516x(config)# boot system disk0:/asa9-13-1-lfbff-k8.SPA

### Reload the standby node for the new firmware to take effect
DS-ESB-ASA5516x(config)# failover reload-standby

### Look at the output from show failover, check if the standby is up and verify the firmware version.

Failover and reload the second node

So now the secondary node is booted with the new firmware, time to failover to it so we can reload and have the new firmware running on the primary node. When doing the failover you might lose the SSH connection, just connect again. This time you will be connected to the second node, that is not the active node. Reload the primary, that is now standby and wait for it up come up. It will show in the console that its sending config to mate. Just like when we did it with the first reload of the standby, secondary node.

### Controlled failover to secoundary, standby node
DS-ESB-ASA5516x# no failover active
### reload the primary, standby node for firmware to take effect.
DS-ESB-ASA5516x# failover reload-standby

You are done

Now it’s only to test, and if you want, failback to the primary. But that up to you. I did not lose one ping through the upgrade process. So that cluster is indeed working as it should. While you are at it then why not also update the AnyConnect client and remember to clean up the flash so the old versions and file won’t fill it up. Enjoy your newly updated cluster.

Prevent Drive Failure at 32,768 Hours

This is one of the nasty bugs. Some SSD models will fail after they have been powered on for more than 32768 hours. Imagine running vSAN and you bought x amount of disks that where affected. They will all fail at the same time, so you are left alone with your backup(hopefully).

I seen this one time before, where Intel disks where the problems. Unfortunately the Intel SSDs where metadata disks in a Ceph storage cluster, and since they all failed at the same time, the cluster died!

This is of cause due to that nobody where informed of the bug. When buying hardware from HPE and other enterprise hardware vendors we cat a mail letting us know of the problem before it becomes a disaster.

https://support.hpe.com/hpsc/doc/public/display?docId=emr_na-a00092491en_us

Update procedure – VMware

We had to do a firmware update of the disks, we are running VMware and vSAN. And gladly HPE have allready released the patch. Also with guidance for VMware.

https://support.hpe.com/hpsc/swd/public/detail?swItemId=MTX_6089c15599b647aca0c049ce24#tab2

  1. download the patch, copy it to /tmp of the ESXi servers.
  2. Unzip and make the .vmexe file executable chmod +x CP****.vmexe
  3. Put one of the hosts into maintenance mode.
  4. Run the CP***.vmexe – ./CP****.vmexe. It will lists the disks that it found and you tell it the disk numbers for those you want to have firmware upgraded.
  5. After upgrade I did a reboot anyway.

Remember that reboot of vSAN nodes can take a long time, 10-30 min. On the console of the server it says: “vSAN initialising SSD XXX” Give it time, it will boot.

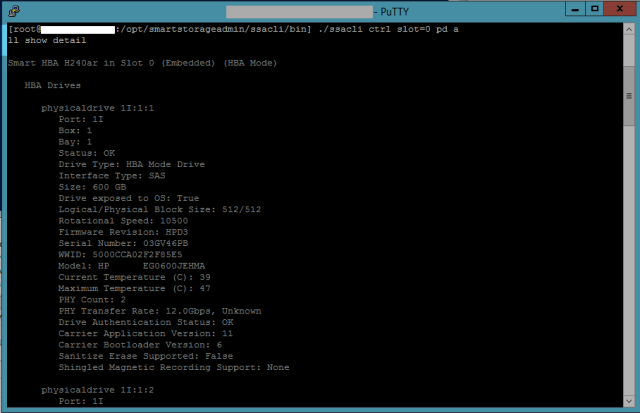
Fetching firmware version

When you use the HPE custom VMware image then we have all the HPE tools on the server, so that we can query hardware etc.

  1. cd /opt/smartstorageadmin/ssacli/bin
  2. Execute ./ssacli ctrl slot=0 pd all show detail

For more a command cheat sheet you could look at https://wiki.phoenixlzx.com/page/ssacli/ or the official documentation https://support.hpe.com/hpsc/doc/public/display?docId=c03909334

This will give you all info on the disks behind the controller. The model number is the one that you can look up on HPEs site to see if its affected.